Have a Question?
-
Sales and Marketing
- Articles coming soon
-
Menu Navigation
- Menu Navigation
- Dashboard
- Sales Orders
- How to open a register
- How to close a register
- How to add a customer to an Order
- How to edit a customer on the sale orders page
- How to Create a customer with the sale orders page
- How to add a product?
- Available payment methods
- How to make a Split Transaction
- How to change the order source
- How to add a billing address
- How to add a shipping address
- How to print a receipt
- How to add a note to the order
- How to turn on or off the auto print receipt
- How to make a Sale
- How to make a Sale Copy
- How to make an exchange
- How to give Store credit
- How to use Store credit
- How to Add a Staff Member to a Cash Register / Point of Sale
- How to create a new Customer in Manage Orders
- How to create a new Order in Manage Orders
- How to search for orders
- How to print an invoice
- How to print an Address
- How to print a Pullsheet
- How to print a Receipt
- How to edit an order
- How to ship an order
- How to delete an order
- How to return a product
- How to create a Purchase Order
- How to view a Purchase Order
- How to Edit a Purchase Order
- How to Print an Invoice
- How to Print Label
- How to create a Vendor
- How to edit a distributor
- How to remove a distributor
- How to Search For An Inventory Item
- How to Manually Adjust an Inventory Quantity on Hand via Transfers or Adjustments
- How to Transfer Inventory from One Location to Another
- How to Adjust the Price of an Inventory Product for Any Sales Channel or Location
- How to Adjust Inventory Quantities or Reserve Quantities for Any Location
- How to Add a Catalog Subscription to Your Database
- How to Stop Automatic Updates to a Catalog Subscription
- How to remove or archive a customer
- How to add a customer from the customer page
- How to add a customer from the Point of Sales page
- How to edit a customer from the customer page
- How to edit a customer from the Point of Sales page
- How to Create a Report
- How to modify a Report
- How to delete a Report
- How to Run a Report
- What sales channels can be added
- How to Create a Point of Sale Channel
- How to edit a sales channel
- How to enable a sales channel
- How to delete a sale channel
- How to add a Country Item
- How to remove a Country Item
- How to edit a Country Item
- How to add a User
- How to edit a User
- How to Change my password
- How to remove a User
- How to add a currency type
- How to remove a currency type
- How to edit a currency type
- How to Create a New Order Status
- How to Edit an Order Status
- How to Delete an Order Status
- How to Add BigCommerce as a Sales Channel
- How to Add a Store Location / Inventory Location
- How to Remove a Store / Inventory Location
- How to Edit a Store / Inventory Location
- How to Create a Cash Register
- How to remove a Cash Register
- How to edit a register
- How to open a register
- How to close a register
- How to view a Cash Register’s transactions for today
- How to view all of a Cash Register’s transactions history
- How to Create a Report
- How to delete a Report
- How to run a Report
- How to modify a Report
- How to add a Setting
- How to modify a Setting
- How to Remove a Setting
- How to turn on or off auto print receipt
- How to add a Search filter
- How to set my time zone
- How to change my permission
- How to change my password
- How to change my user image
- How to Log Out
- Mantle Table Functions
- How to Add a Report to My Dashboard
- How to Remove a Report from the Dashboard
- How to view a return order
- How to Archive a Product
- How To Add Shopify Sales Channel
- How to add the API key to Endicia
- How to add a Carrier
- How to edit a Carrier
- How to remove a Carrier
- How to add a Content Type
- How to edit a Content Type
- How to remove a Contents Type
- How to add a Delivery Confirmation Type
- How to edit a Delivery Confirmation Type Type
- How to remove a Delivery Confirmation Type
- How to add a Dimension Unit
- How to edit a Dimension Unit Type
- How to remove a Dimension Unit
- How to add a Label Format
- How to edit a Label Format Type
- How to remove a Label Format
- How to add a Label Output Type
- How to edit a Label Output Type
- How to remove a Label Output Type
- How to add a Label Size
- How to edit a Label Size Type
- How to remove a Label Size
- How to add a Non Delivery Option
- How to edit a Non Delivery Option Type
- How to remove a Non Delivery Option
- How to add a Packaging Type
- How to edit a Packaging Type Type
- How to remove a Packaging Type
- How to add a Service Type
- How to edit a Service Type
- How to remove a Service Type
- How to add a Weight Unit
- How to edit a Weight Unit Type
- How to remove a Weight Unit
- How to Edit a Search Filter
- How to remove a Search filter
- How to make a return
- How to add a product to the Inventory
- Show Remaining Articles (130) Collapse Articles
-
- Sales Orders
- How to open a register
- How to close a register
- How to add a customer to an Order
- How to edit a customer on the sale orders page
- How to Create a customer with the sale orders page
- How to add a product?
- Available payment methods
- How to make a Split Transaction
- How to change the order source
- How to add a billing address
- How to add a shipping address
- How to print a receipt
- How to add a note to the order
- How to turn on or off the auto print receipt
- How to make a Sale
- How to make a Sale Copy
- How to make an exchange
- How to give Store credit
- How to use Store credit
- How to Add a Staff Member to a Cash Register / Point of Sale
- How to create a new Customer in Manage Orders
- How to create a new Order in Manage Orders
- How to search for orders
- How to print an invoice
- How to print an Address
- How to print a Pullsheet
- How to print a Receipt
- How to edit an order
- How to ship an order
- How to delete an order
- How to return a product
- How to view a return order
- How to make a return
- Show Remaining Articles (19) Collapse Articles
-
- Articles coming soon
-
- How to open a register
- How to close a register
- How to add a customer to an Order
- How to edit a customer on the sale orders page
- How to Create a customer with the sale orders page
- How to add a product?
- Available payment methods
- How to make a Split Transaction
- How to change the order source
- How to add a billing address
- How to add a shipping address
- How to print a receipt
- How to add a note to the order
- How to turn on or off the auto print receipt
- How to make a Sale
- How to make a Sale Copy
- How to make an exchange
- How to give Store credit
- How to use Store credit
- Show Remaining Articles (4) Collapse Articles
-
- How to Add a Staff Member to a Cash Register / Point of Sale
- How to create a new Customer in Manage Orders
- How to create a new Order in Manage Orders
- How to search for orders
- How to print an invoice
- How to print an Address
- How to print a Pullsheet
- How to print a Receipt
- How to edit an order
- How to ship an order
- How to delete an order
- How to return a product
- How to view a return order
- How to make a return
-
- Articles coming soon
-
- How to create a new Customer in Manage Orders
- How to create a new Order in Manage Orders
- How to search for orders
- How to print an invoice
- How to print an Address
- How to print a Pullsheet
- How to print a Receipt
- How to edit an order
- How to ship an order
- How to delete an order
- How to return a product
- How to make a return
-
- How to Search For An Inventory Item
- How to Add a Catalog Subscription to Your Database
- How to Adjust the Price of an Inventory Product for Any Sales Channel or Location
- How to Transfer Inventory from One Location to Another
- How to Manually Adjust an Inventory Quantity on Hand via Transfers or Adjustments
- How to add a product to the Inventory
-
- How to Search For An Inventory Item
- How to Manually Adjust an Inventory Quantity on Hand via Transfers or Adjustments
- How to Transfer Inventory from One Location to Another
- How to Adjust the Price of an Inventory Product for Any Sales Channel or Location
- How to Adjust Inventory Quantities or Reserve Quantities for Any Location
- How to Archive a Product
-
- Articles coming soon
-
- Articles coming soon
-
- How to add a Country Item
- How to remove a Country Item
- How to edit a Country Item
- How to add a User
- How to edit a User
- How to Change my password
- How to remove a User
- How to add a currency type
- How to remove a currency type
- How to edit a currency type
- How to Create a New Order Status
- How to Edit an Order Status
- How to Delete an Order Status
- How to Add a Store Location / Inventory Location
- How to Remove a Store / Inventory Location
- How to Edit a Store / Inventory Location
- How to Create a Cash Register
- How to remove a Cash Register
- How to edit a register
- How to open a register
- How to close a register
- How to view a Cash Register’s transactions for today
- How to view all of a Cash Register’s transactions history
- How to Create a Report
- How to delete a Report
- How to run a Report
- How to modify a Report
- How to add a Setting
- How to modify a Setting
- How to Remove a Setting
- How to turn on or off auto print receipt
- How to add a Search filter
- How to add the API key to Endicia
- How to add a Carrier
- How to edit a Carrier
- How to remove a Carrier
- How to add a Content Type
- How to edit a Content Type
- How to remove a Contents Type
- How to add a Delivery Confirmation Type
- How to edit a Delivery Confirmation Type Type
- How to remove a Delivery Confirmation Type
- How to add a Dimension Unit
- How to edit a Dimension Unit Type
- How to remove a Dimension Unit
- How to add a Label Format
- How to edit a Label Format Type
- How to remove a Label Format
- How to add a Label Output Type
- How to edit a Label Output Type
- How to remove a Label Output Type
- How to add a Label Size
- How to edit a Label Size Type
- How to remove a Label Size
- How to add a Non Delivery Option
- How to edit a Non Delivery Option Type
- How to remove a Non Delivery Option
- How to add a Packaging Type
- How to edit a Packaging Type Type
- How to remove a Packaging Type
- How to add a Service Type
- How to edit a Service Type
- How to remove a Service Type
- How to add a Weight Unit
- How to edit a Weight Unit Type
- How to remove a Weight Unit
- How to Edit a Search Filter
- How to remove a Search filter
- Show Remaining Articles (53) Collapse Articles
-
- How to add the API key to Endicia
- How to add a Carrier
- How to edit a Carrier
- How to remove a Carrier
- How to add a Content Type
- How to edit a Content Type
- How to remove a Contents Type
- How to add a Delivery Confirmation Type
- How to edit a Delivery Confirmation Type Type
- How to remove a Delivery Confirmation Type
- How to add a Dimension Unit
- How to edit a Dimension Unit Type
- How to remove a Dimension Unit
- How to add a Label Format
- How to edit a Label Format Type
- How to remove a Label Format
- How to add a Label Output Type
- How to edit a Label Output Type
- How to remove a Label Output Type
- How to add a Label Size
- How to edit a Label Size Type
- How to remove a Label Size
- How to add a Non Delivery Option
- How to edit a Non Delivery Option Type
- How to remove a Non Delivery Option
- How to add a Packaging Type
- How to edit a Packaging Type Type
- How to remove a Packaging Type
- How to add a Service Type
- How to edit a Service Type
- How to remove a Service Type
- How to add a Weight Unit
- How to edit a Weight Unit Type
- How to remove a Weight Unit
- Show Remaining Articles (19) Collapse Articles
-
- Articles coming soon
-
- Articles coming soon
-
- Articles coming soon
-
- Articles coming soon
-
- Articles coming soon
-
- Articles coming soon
-
Onboarding
-
Reports
-
Mantle User Info
-
Mantle Tables
- Articles coming soon
Table of Contents
< All Topics
Print
How To Add Shopify Sales Channel
Posted
Updated
ByKevin Kirwan
How to Connect Your Shopify Account to Mantle
- Log into Mantle and Shopif
- Open one browser tab and log into your Mantle account.
- In a separate browser tab, log into your Shopify account.
- Navigate to Channels in Mantle
- In your Mantle tab, locate the left-side menu.
- Click CHANNELS to expand the dropdown menu, then select MANAGE CHANNELS.
- You’ll see a list of your current channels (if any). At the bottom of the page, click ADD A SALES CHANNEL.
- A popup will appear showing available integrations. Select SHOPIFY.
- Set Up an App in Shopify
- Switch to your Shopify tab.
- (If you’re not logged in, log in now.
- On Shopify’s left-side menu, click APPS. A popup will appear; select APP AND SALES CHANNEL SETTINGS.
- On the new page labeled APPS AND SALES CHANNELS, click DEVELOP APPS on the right-hand side.
- Once the page loads, click CREATE AN APP at the top-right corner.
- Create the App
- A popup will appear. Name the app something easy to remember, such as “Mantle Integration.”
- The App Developer field should auto-fill with your Shopify account name and email address.
- Click CREATE APP.
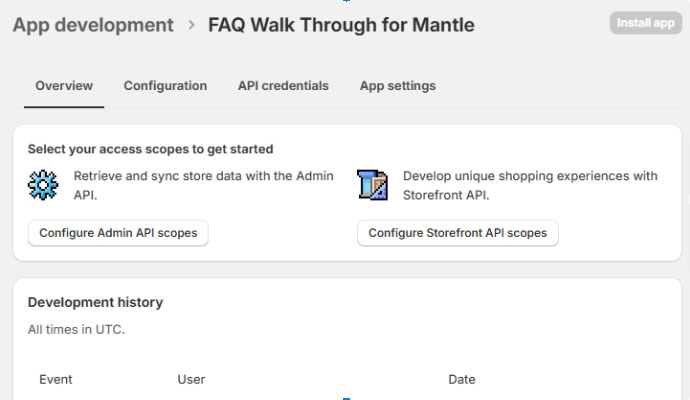
- At the top of the page, you’ll see the title APP DEVELOPMENT > (Your App Name).
- Configure Admin API Scopes
- In the app screen, locate and click CONFIGURE ADMIN API SCOPES (middle-left of the screen).
- On the ADMIN API ACCESS SCOPES page, scroll down and check every single box. (Note: There’s no “select all” button—you must manually check each box.)
- After selecting all scopes, click SAVE at the top-right of the screen.
- Install the App
- Go to the API CREDENTIALS tab at the top menu.
- Click INSTALL APP in the middle of the screen.
- A warning popup will appear; confirm by clicking INSTALL. (Do not refresh or navigate away while the app is installing.)
- Save Your Admin API Access Token
- Once the app is installed, you’ll see your ADMIN API ACCESS TOKEN.
- Important: You can only reveal this token once. Copy and save it immediately in a secure location (e.g., Mantle or a text document).
- If you lose the token, you’ll need to delete the app and start over.
- Connect the App to Mantle
- In Mantle, paste the API ADMIN ACCESS TOKEN and API Key into the appropriate fields.
- Select the INVENTORY LOCATION from the dropdown menu. (If no inventory locations exist, create one first in Mantle and save your token.)
- Note: You can link multiple inventory locations to your sales channel.
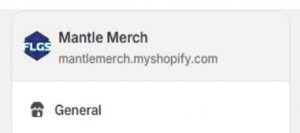
- Add Your Shopify Store Name
- In Mantle, enter your Shopify Store Name into the STORE NAME field.
- Important: Only enter the store name without .myshopify.com or https://.
- To find your store name, look at the text before .myshopify.com in the top-left corner of the Shopify API page.
- Validate the Integration
- After entering all required information in Mantle, click VALIDATE.
- Channel Status Mappings
- Once validation is complete, a popup window labeled Channel Status Mappings will appear.
- For now, you can close this window.
- View and Manage Sales Channels in Mantle
- In Mantle, you’ll now see a list of all your current sales channels, including active and inactive ones.
- Enable the Shopify Channel
- If you’re ready to push inventory to your Shopify channel, locate the channel in Mantle.
- On the right-hand side, click the ACTION dropdown menu and select ENABLE.
- A confirmation popup will appear. Click CONFIRM to enable the channel.
Helpful Tips
- Always double-check you’ve saved your ADMIN API ACCESS TOKEN before leaving the Shopify app screen.
- If you encounter issues during the setup, delete the app in Shopify and restart the process.

Posted
Updated
ByKevin Kirwan